back to projects page
We made a circuit that would make all 10 LEDs light at the same time, make them run, and finally, make them stop at the same time…just by clapping! How did we do that? Well, simple. This is the description of the process. Hope you enjoy!
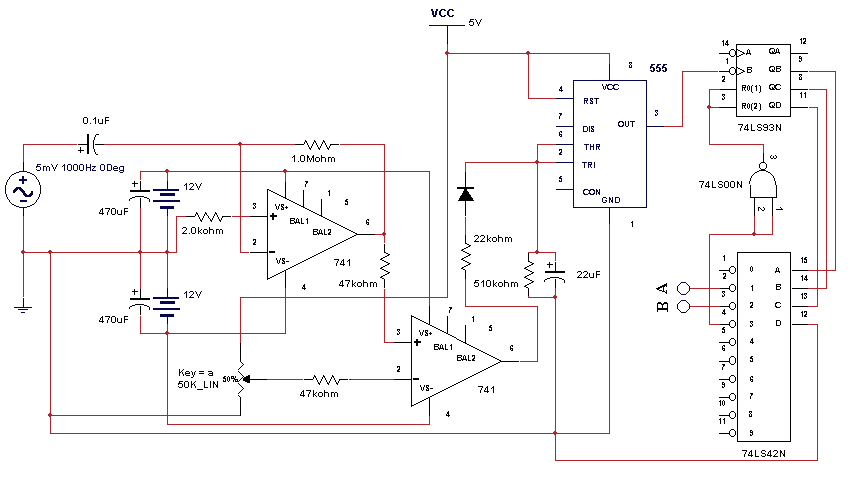
First, let us tell you of our chips and the elements (except for the resistors and their values). We used the mic, diode (a lot of them), 741 (2), 555, 7493,7442, 7400, and of course, the previous project , the never-ending running lights. So, where do we begin?
We began by attaching the mic to our circuit. What does the mic do? It gets the sound waves from the environment and transforms them to voltages. Voltages have an equivalent sound wave, you see. So from here, the voltage goes to the diode so that the voltage flow will not fluctuate as it goes to our circuit. With this, we realized that the equivalent voltage that we have is so small that it won't make our LEDs light up! What do we do?! We use the op amp to, as its name implies, amplify the given voltage. Our voltage passes to the first 741 so that it will magnify. The output voltage will be coming from the pin 6, but pin 6 of the first op amp is connected to the second op amp. Why do we need this? We need another 741 to compare the given voltage with our desired voltage. We specify our desired voltage with the use of the potentiometer, which is responsible for the indicating the sensitivity of the mic to the sound waves. Now, with the use of the second op amp, we are able to, as we said earlier, compare the voltage that we have with the voltage that we desire. If the given voltage is less than that of the desired voltage, the second 741 will give a voltage of -5V, or a voltage that is less than 0.7V. Else, if the voltage is greater than that of the desired voltage, the op amp will give a voltage that is greater than 0.7V, or to be exact, 5V. Like the first 741, the output pin is pin 6. As the voltage goes out, it has to pass a diode. What does this diode do? This diode, like all other diodes control the voltage flow. If the voltage is -5V, then it would be too small and cannot pass through the diode. Only if it is 5V can it pass through the diode. So, when the sound is soft, because of the diode, there will not be any voltage nor current that will pass through the circuit (after our beloved diode).
So, let's proceed to the 555. What does the 555 do? If you remember from our dancing-lights project, the 555 is a timer. It uses its pins 2 and 6 to tell its pin 3 to go high or low. If you can recall, it is connected to a capacitor. Whenever, the current in the capacitor is less than 2/3 full, it would continue to charge. Else it will discharge. Whenever voltage is less than that of the desired voltage, the current in the capacitor will be less than 2/3 full. Thus, the capacitor is charging. With this is mind, the 555 will only pulse whenever the voltage is greater than the desired voltage. It will only output a 1 whenever the current in the capacitor is greater than 2/3. It will output using its pin 3.
Where is this pin 3 connected? Like our previous experiments, pin 3 of the 555 is connected to the input pin of the 7493, which is the counter. The input pin is pin 1. Pins 2 and pins 3 serve as the resetting pins, but more of that later. The 7493 has 4 output pins, namely 12, 9m, 8 and 11. However, pin 11 is connected to the ground because for our project, we only need 3 outputs. These outputs are connected to the input pins of the 7442 chip.
What does this 7442 do? The important thing about the 7442 is that it has 10 outputs. Since it is connected to the timer, it is aware of the current count that the counter is in. Thus, as the 7493 counts, it too will count. For every specific count, there is an equivalent pin that will turn "off". See the default mode of the output pins is "high". In the dancing lights experiment, no voltage passes through the LEDs if it is not the equivalent pin of the specific count because there is no voltage drop. So, back to the present topic. This 7442 is important because we will be getting from it the inputs for the transistors that will prove important later in our project. Its fourth output pin which, as it turn out, is pin 4 is connected to the first 2 inputs of the NAND chip, or the 7400. Since the two inputs of the NAND chip are the same, and they are connected to the 4th pin of the 7442, the output of pins 1 and 2 of the NAND, or pin 3, would only turn high whenever the current count of the 7442 is 4…or it is in the 4th clap. This output pin is connected to pin 2 and 3 of the 7493, and whenever it gives a "1", these 2 pins of the 7493 would also become "1". Thus, resetting the count.
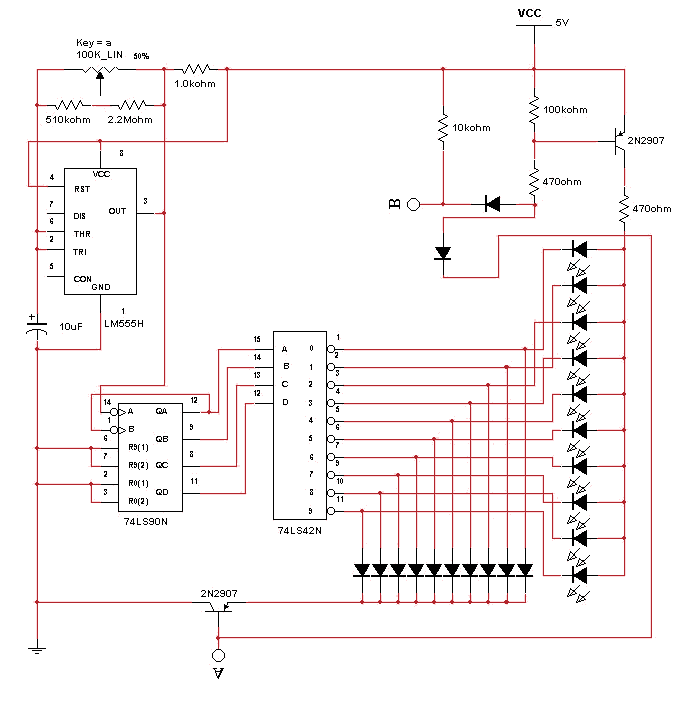
Let's move on to the dancing-lights project. From the dancing-lights project, we connected diodes to the LEDs. We also made use of 2 transistors. We were concerned with the switching on and off of the LEDs because as they are, they already run. Thus, we connected the LEDs to the first transistor. What does this transistor do? See, we also connected the transistor's base to the pin 1 of the 7442. It is also connected to the diodes that are connected to the LEDs. This transistor will give off current whenever the count is 1. So, whenever the pin 1 of the circuit goes low, the LEDs will all light.
We also used another transistor to detect whenever it is the 3rd clap. To do this, we also connected the base of this transistor to the pin 3 of the 7442, and connected it to the LEDs. Therefore, whenever the count is 3, the LEDs will turn off.
We hope that you will be able to see how our circuit works. We also hope that you will have fun in our presentation! =)
back to projects page