1. Introduction
In this experiment, we aim to know how the electric circuit and IC works.
2. Materials
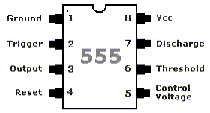
A. 555 Integrated Circuit: We used a 8-pin DIP 'V' package type 555 IC. "The IC Time Machine." It can be used for monostable and astable oscillators.
 
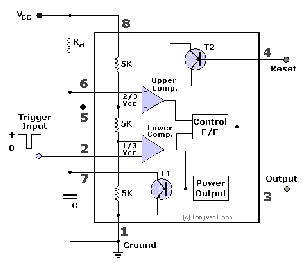
Inside the 555 timer are the equivalent of over 20 transistors, 15 resistors, and 2 diodes, depending of the manufacturer. The equivalent circuit, in block diagram, providing the functions of control, triggering, level sensing or comparison, discharge, and power output. Some of the more attractive features of the 555 timer are: Supply voltage between 4.5 and 18 volt, supply current 3 to 6 mA, and a Rise/Fall time of 100 n Sec. It can also withstand quite a bit of abuse.
B. Circuit Board
C. Capacitor (Electrical condenser):
It is a device for storing an electrical charge.
Capacitors have two main features. One of which is a function to charge or discharge electricity. This function is applied to smoothing circuits of power supplies, backup circuits of microcomputers, and timer circuits that make use of the periods to charge or discharge electricity. The other is a function to block the flow of DC. This function is applied to filters that extract or eliminate particular frequencies. This is indispensable to circuits where excellent frequency characteristics are required.
Capacitors usually have two legs. One leg is the positive leg and the other is the negative leg. When we put one in a circuit, we must make sure the positive leg and the negative leg go in the right place. Capacitors do not always have a positive leg and a negative leg.
D. Resistor
Resistor is a component of an electric circuit that resists the flow of direct or alternating electric current. Resistors can limit or divide the current, reduce the voltage, protect an electric circuit, or provide large amounts of heat or light.
E. Insulated wires
F. Diode
LED (Light Emitting Diode): It is a device that emits visible light or infrared radiation when an electric current passes through it.
G. Potentiometer: Resistors with adjustable resistance are called rheostats or potentiometers. These types of resistors are used in appliances when the current needs to be adjusted or when the resistance needs to be varied, as with lights that dim or adjustable generators.
H. 5 Volts Power Supply
3. Procedure
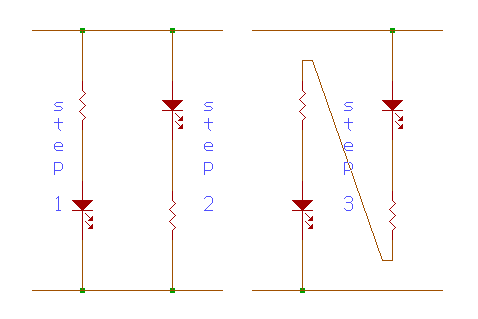
 A. Step 1: We connected one red color LED and 470 resistor to the circuit board.
When we turned the power supply on, the LED lights.
B. Step 2: We connected another yellow color LED and 470 resistor to the circuit board. So, we combined two LEDs and registors. When we turned the power supply on, both of them lights.
C. Step 3: We connected a wire between two LEDs and resistors.
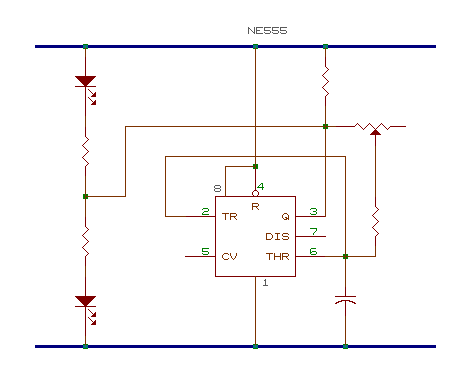
D. Step 4: We connected the 555 IC to the circuit of the step 3 as shown below. And we observed the two LEDs which turned on and off one after another at regular intervals..
 E. Step 5: After making a circuit, we put a potentiometer instead of resistors. We could control the interval of blinking.
A. What purpose do the resistors have in the Step 1 & Step 2 diagrams?
The purpose of the resistors is to control the current flowing through the circuit to the LEDs. In order to light up an LED, it is necessary to apply a voltage of about 2V across its two terminals. The LED has a limit for the current so that it can light up only if the current is less than or equal to 10 mA. Therefore, we used a 470 resistors which ensures the appropriate current for LEDs. By the Ohm's Law V=IR, we calculated the value of the current passing through the LEDs.
V/R = I, 5V / 470 = 10.4 mA (1mA = 1/1000A)
We can assume that connecting the LEDs directly to the 5V power supply might destroy the LED since too much and excessive current will flow through the LED.
B. How do you recognize 1's and 0's using the circuit you built in Step 3? Give a brief explanation.
A probe is used to determine 1's and 0's from the circuit. The probe is a wire connected in between the two resistors and LEDs. First, we connected the probe to the ground and the +5 to recognize the 1's and 0's. When we connected the probe to the +5, the red LED for signal 1 turned on. To determine the signal, simply connect the probe to either side of the circuit. If a signal is 1, the red LED will be turned on. If a signal is 0, the yellow LED will be turned on.
C. What is the purpose of the capacitor and resistor to control the speed of the change from "1" and "0" in the diagram. Give a brief explanation.
The purpose of the capacitor and resistor is to create a pulse. The way the pulse is created is by using components in a circuit attached to the 555. This circuit is made of a capacitor and a resistor. We can flip a switch and start charging the capacitor. The resistor is used to control how fast the capacitor charges. The bigger the resistance, the longer it takes to charge the capacitor.
The voltage in the capacitor can then be used as an input to another switch. Since the voltage starts at 0, nothing happens to the second switch. But eventually the capacitor will charge up to some point where the second switch comes on.
Once we connected a potentiometer to the circuit, we were able to control the interval of charging for the capacitor so that we actually control the speed of blinking of the LEDs.
D. How does the 555 run an "oscillator"? Give a brief explanation.
The 555 is made out of transistors that are about the same as on / off switches. When you apply a voltage they turn on and when you take away the voltage they turn off. So by itself, the 555 can not create a pulse. The way the pulse is created is by attaching our first circuits (Step 1,2, and 3) to the 555.
The way the 555 timer works is that when you flip the first switch, the Output pin goes to Vcc (the positive power supply voltage) and starts charging the capacitor. When the capacitor voltage gets to 2/3 Vcc (that is Vcc * 2/3) the second switch turns on which makes the output go to 0 volts.
To make the LED flash continually without having to trigger it, we hooked up the 555 so that it triggers itself. The way this works is that we add in a resistor between the capacitor and the discharge pin, Pin 7. The capacitor charges up through resistors and when it reaches 2/3 Vcc, Pin 3 and Pin 7 will go to ground. But the capacitor can not discharge immediately because of resistor. It takes some time for the charge to drain through resistor. The more resistance resistor has, the longer it takes to discharge. The time it takes to discharge the capacitor will be the time the LED is off. To trigger the 555 again, we connect Pin 6 to the trigger (Pin 2). As the capacitor is discharging, the voltage in the capacitor gets lower and lower. When it gets down to 1/3 Vcc this triggers Pin 2 causing Pin 3 to go to Vcc and the LED to come on. The 555 disconnects Pin 7 from ground, and the capacitor starts to charge up again through resistors.

Conclusion.
In this experiment, we try to understand the operation of the 555 timer. And we actually made an oscillator with a 555 timer IC. We researched about the materials which we used for our experiment so that we could have a clear view of our circuit. That helped us to understand our circuit well.
We noticed that the 555 IC is very versatile which can be used as bistable and astable. We hope to make some buzzer by using of the 555 IC for the next time.
During our experiment, all of us were troubleshooters who want to figure the problem out. What we did to find a problem is that we had to redo our experiment again and again. Through the troubleshooting, we were able to find a joy and get a deep understanding from our experiment.
|